Thursday, December 18, 2014

Footer coming Top of the keyboard when Softkeyboard up in Android

I am working in android application want to use common header and footer. so i tried like this. when softkeyboard up the footer coming up the top of the softkeyboard.

<RelativeLayout xmlns:android="http://schemas.android.com/apk/res/android"
android:layout_width="fill_parent"
android:layout_height="fill_parent"
android:fillViewport="true">
<RelativeLayout
    android:layout_width="fill_parent"
    android:layout_height="wrap_content"
    android:background="#fff">

    <!--  Header  Starts-->
    <LinearLayout android:id="@+id/header"
                  android:layout_width="fill_parent"
                  android:layout_height="wrap_content"
                  android:background="@layout/header_gradient"
                  android:paddingTop="5dip"
                  android:paddingBottom="5dip">
        <!-- Logo Start-->
        <!--<ImageView android:src="@drawable/logo"-->
                   <!--android:layout_width="wrap_content"-->
                   <!--android:layout_height="wrap_content"-->
                   <!--android:layout_marginLeft="10dip"/>-->
        <!-- Logo Ends -->
    </LinearLayout>
    <!--  Header Ends -->
    <!-- Footer Start -->
    <LinearLayout android:id="@+id/footer"
                  android:layout_width="fill_parent"
                  android:layout_height="40dip"
                  android:background="@layout/footer_repeat"
                  android:layout_alignParentBottom="true">
    </LinearLayout>
    <!-- Footer Ends -->

    <!-- Login Form -->
    <LinearLayout
        xmlns:android="http://schemas.android.com/apk/res/android"
        android:orientation="vertical"
        android:layout_width="match_parent"
        android:layout_height="wrap_content"
        android:padding="10dip"
        android:layout_below="@id/header">
        <!--  Username Label -->
        <TextView android:layout_width="fill_parent"
                  android:layout_height="wrap_content"
                  android:textColor="#372c24"
                  android:text="Username"/>
        <EditText android:id="@+id/reg_username"
                  android:layout_width="fill_parent"
                  android:layout_height="wrap_content"
                  android:layout_marginTop="5dip"
                  android:singleLine="true"
                  android:layout_marginBottom="20dip"
                  android:textColor="#000"/>
        <!-- Password Label -->
        <TextView android:layout_width="fill_parent"
                  android:layout_height="wrap_content"
                  android:textColor="#372c24"
                  android:text="Password"/>
        <EditText android:id="@+id/reg_password"
                  android:layout_width="fill_parent"
                  android:layout_height="wrap_content"
                  android:password="true"
                  android:singleLine="true"
                  android:layout_marginTop="5dip"
                  android:textColor="#000"/>
        <!-- Login Button -->
        <Button android:id="@+id/buttonLogin"
                android:layout_width="fill_parent"
                android:layout_height="wrap_content"
                android:layout_marginTop="10dip"
                android:isScrollContainer="false"
                android:text="Login"/>

    </LinearLayout>
    <!-- Login Form Ends -->
</RelativeLayout>
</RelativeLayout>


Solution:

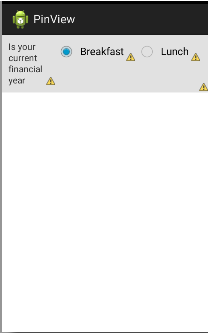
I found the solution just add one attribute in your activity tag in android manifest.xml like this

If you want more detail about this attribute, please reference this:

wsoft

<activity android:windowSoftInputMode="adjustPan" . . . >


Monday, December 15, 2014

How to Tableview row dainamically in Android

I want to create tableview first i want to dispay one row when user want to another row just click the create row button.

It will created row automatically using this method.

@Override
public void onCreate(Bundle savedInstanceState)
{
    super.onCreate(savedInstanceState);
    TableLayout tableLayout = new TableLayout(getApplicationContext());
    TableRow tableRow;
    TextView textView;

    for (int i = 0; i < 4; i++) {
        tableRow = new TableRow(getApplicationContext());
        for (int j = 0; j < 3; j++) {
            textView = new TextView(getApplicationContext());
            textView.setText("test");
            textView.setPadding(20, 20, 20, 20);
            tableRow.addView(textView);
        }
        tableLayout.addView(tableRow);
    }
    setContentView(tableLayout);
}

Align LinearLayout view content been shifted down in android

The weight system of LinearLayout makes using it to build rows with even spacing across the children simple and effective. However, as often as you may have done this, you might have also run into a perplexing issue that arises when the text of one or more elements inside the row gets long enough to force line wrapping.

Not only has the view content been shifted down, but the parent container isn’t sized to fit the larger height this creates, so part of the shifted view is clipped! Also notice that the view is shifted even in cases where the multiple lines don’t make the view inherently taller. This behavior makes absolutely no sense, until you understand what is actually going on under the hood. If we take a much closer look at the alignment of the child elements, something interesting emerges.

<LinearLayout
    android:layout_width="match_parent"
    android:layout_height="wrap_content"
    android:layout_baselineAligned="false"
    android:orientation="horizontal">
    <Button
        android:layout_width="0dp"
        android:layout_height="wrap_content"
        android:layout_weight="1"
        android:textSize="12dp"
        android:text="Last" />
    <Button
        android:layout_width="0dp"
        android:layout_height="wrap_content"
        android:layout_weight="1"
        android:textSize="12dp"
        android:text="Next" />
    <Button
        android:layout_width="0dp"
        android:layout_height="wrap_content"
        android:layout_weight="1"
        android:textSize="12dp"
        android:text="Reload Content" />
    <Button
        android:layout_width="0dp"
        android:layout_height="wrap_content"
        android:layout_weight="1"
        android:textSize="12dp"
        android:text="Exit" />
</LinearLayout>

Align RedioGroup Button in android LinearLayout Page

I am working in android application i want to align redioGroup button using linearLayout horizontal.

I tried half day to align this Rediogroup. just give layout_weight carefully. because we want to align comford all the device.

So just copy and past your xml file. you can implement like this.


<?xml version="1.0" encoding="utf-8"?>
<RelativeLayout xmlns:android="http://schemas.android.com/apk/res/android"
    android:layout_width="match_parent"
    android:layout_height="match_parent" >

    <LinearLayout
        android:layout_width="match_parent"
        android:layout_height="wrap_content"
        android:background="#E1E1E1"
        android:orientation="horizontal"
        android:padding="10dp"
        android:weightSum="2" >

        <TextView
            android:layout_width="0dp"
            android:layout_height="wrap_content"
            android:layout_weight="1.5"
            android:text="Is your current financial year" />

        <RadioGroup
            android:id="@+id/radioGroup1"
            android:layout_width="wrap_content"
            android:layout_height="wrap_content"
            android:layout_weight=".5"
            android:orientation="horizontal" >

            <RadioButton
                android:id="@+id/radio0"
                android:layout_width="wrap_content"
                android:layout_height="wrap_content"
                android:layout_marginRight="2dp"
                android:layout_weight=".25"
                android:checked="true"
                android:padding="5dp"
                android:text="Breakfast" />

            <RadioButton
                android:id="@+id/radio1"
                android:layout_width="wrap_content"
                android:layout_height="wrap_content"
                android:layout_marginRight="2dp"
                android:layout_weight=".25"
                android:padding="5dp"
                android:text="Lunch" />
        </RadioGroup>
    </LinearLayout>

</RelativeLayout>

Thursday, December 11, 2014

Get the direction using google map in Phonegap

I am working in phonegap application i want to display the google map and get the current location and set the marker in google map.

I found the solution from stackoverflow it working goods.

Easy to implement in phonegap and jquery mobile. Just copy and past your project index.html file.

It will come google map in your divce.

Below you can find a basic example of using the Google Maps directions service in a jQuery Mobile page

<!DOCTYPE html>
<html>
    <head>
        <title>jQuery mobile with Google maps geo directions example</title>
        <meta content="en" http-equiv="content-language">
        <link rel="stylesheet" href="http://code.jquery.com/mobile/1.2.0/jquery.mobile-1.2.0.min.css" />
        <script src="http://code.jquery.com/jquery-1.8.2.min.js"></script>
        <script src="http://code.jquery.com/mobile/1.2.0/jquery.mobile-1.2.0.min.js"></script>
        <script type="text/javascript" src="http://maps.google.com/maps/api/js?v=3&sensor=false&language=en"></script>
        <script type="text/javascript">
            $(document).on("pageinit", "#map_page", function() {
                initialize();
            });

            $(document).on('click', '#submit', function(e) {
                e.preventDefault();
                calculateRoute();
            });

            var directionDisplay,
                directionsService = new google.maps.DirectionsService(),
                map;

            function initialize() 
            {
                directionsDisplay = new google.maps.DirectionsRenderer();
                var mapCenter = new google.maps.LatLng(59.3426606750, 18.0736160278);

                var myOptions = {
                    zoom:10,
                    mapTypeId: google.maps.MapTypeId.ROADMAP,
                    center: mapCenter
                }

                map = new google.maps.Map(document.getElementById("map_canvas"), myOptions);
                directionsDisplay.setMap(map);
                directionsDisplay.setPanel(document.getElementById("directions"));  
            }

            function calculateRoute() 
            {
                var selectedMode = $("#mode").val(),
                    start = $("#from").val(),
                    end = $("#to").val();

                if(start == '' || end == '')
                {
                    // cannot calculate route
                    $("#results").hide();
                    return;
                }
                else
                {
                    var request = {
                        origin:start, 
                        destination:end,
                        travelMode: google.maps.DirectionsTravelMode[selectedMode]
                    };

                    directionsService.route(request, function(response, status) {
                        if (status == google.maps.DirectionsStatus.OK) {
                            directionsDisplay.setDirections(response); 
                            $("#results").show();
                            /*
                                var myRoute = response.routes[0].legs[0];
                                for (var i = 0; i < myRoute.steps.length; i++) {
                                    alert(myRoute.steps[i].instructions);
                                }
                            */
                        }
                        else {
                            $("#results").hide();
                        }
                    });

                }
            }
        </script>
    </head>
    <body>
        <div data-role="page" id="map_page">
            <div data-role="header">
                <h1><a href="#">jQuery mobile - Google maps directions service</h1>
            </div>
            <div data-role="content">
                <div class="ui-bar-c ui-corner-all ui-shadow" style="padding:1em;">
                    <div id="map_canvas" style="height:300px;"></div>
                    <div data-role="fieldcontain">
                        <label for="from">From</label> 
                        <input type="text" id="from" value="Goteborg, Sweden"/>
                    </div>
                    <div data-role="fieldcontain">
                        <label for="to">To</label> 
                        <input type="text" id="to" value="Stockholm, Sweden"/>
                    </div>
                    <div data-role="fieldcontain">
                        <label for="mode" class="select">Transportation method:</label>
                        <select name="select-choice-0" id="mode">
                            <option value="DRIVING">Driving</option>
                            <option value="WALKING">Walking</option>
                            <option value="BICYCLING">Bicycling</option>
                        </select>
                    </div>
                    <a data-icon="search" data-role="button" href="#" id="submit">Get directions</a>
                </div>
                <div id="results" style="display:none;">
                    <div id="directions"></div>
                </div>
            </div>
        </div>
    </body>
</html>


Step: 1

The below example uses the current position which is automatically located and a target destination address which is given from the user.

<!doctype html>
<html lang="en">
   <head>
        <title>jQuery mobile with Google maps</title>
        <link rel="stylesheet" href="http://code.jquery.com/mobile/1.2.0/jquery.mobile-1.2.0.min.css" />
        <script src="http://code.jquery.com/jquery-1.8.2.min.js"></script>
        <script src="http://code.jquery.com/mobile/1.2.0/jquery.mobile-1.2.0.min.js"></script>
        <script type="text/javascript" src="http://maps.google.com/maps/api/js?v=3&sensor=false&language=en"></script>
        <script type="text/javascript">

            var map,
                currentPosition,
                directionsDisplay, 
                directionsService,
                destinationLatitude = 59.3426606750,
                destinationLongitude = 18.0736160278;

            function initializeMapAndCalculateRoute(lat, lon)
            {
                directionsDisplay = new google.maps.DirectionsRenderer(); 
                directionsService = new google.maps.DirectionsService();

                currentPosition = new google.maps.LatLng(lat, lon);

                map = new google.maps.Map(document.getElementById('map_canvas'), {
                   zoom: 15,
                   center: currentPosition,
                   mapTypeId: google.maps.MapTypeId.ROADMAP
                 });

                directionsDisplay.setMap(map);

                 var currentPositionMarker = new google.maps.Marker({
                    position: currentPosition,
                    map: map,
                    title: "Current position"
                });

                // current position marker info
                /*
                var infowindow = new google.maps.InfoWindow();
                google.maps.event.addListener(currentPositionMarker, 'click', function() {
                    infowindow.setContent("Current position: latitude: " + lat +" longitude: " + lon);
                    infowindow.open(map, currentPositionMarker);
                });
                */

                // calculate Route
                calculateRoute();
            }

            function locError(error) {
               // the current position could not be located
            }

            function locSuccess(position) {
                // initialize map with current position and calculate the route
                initializeMapAndCalculateRoute(position.coords.latitude, position.coords.longitude);
            }

            function calculateRoute() {

                var targetDestination =  new google.maps.LatLng(destinationLatitude, destinationLongitude);
                if (currentPosition != '' && targetDestination != '') {

                    var request = {
                        origin: currentPosition, 
                        destination: targetDestination,
                        travelMode: google.maps.DirectionsTravelMode["DRIVING"]
                    };

                    directionsService.route(request, function(response, status) {
                        if (status == google.maps.DirectionsStatus.OK) {
                            directionsDisplay.setPanel(document.getElementById("directions"));
                            directionsDisplay.setDirections(response); 

                            /*
                                var myRoute = response.routes[0].legs[0];
                                for (var i = 0; i < myRoute.steps.length; i++) {
                                    alert(myRoute.steps[i].instructions);
                                }
                            */
                            $("#results").show();
                        }
                        else {
                            $("#results").hide();
                        }
                    });
                }
                else {
                    $("#results").hide();
                }
            }

            $(document).live("pagebeforeshow", "#map_page", function() {
                // find current position and on success initialize map and calculate the route
                navigator.geolocation.getCurrentPosition(locSuccess, locError);
            });

        </script>
    </head>
    <body>
        <div id="basic-map" data-role="page">
            <div data-role="header">
                <h1><a data-ajax="false" href="/">jQuery mobile with Google maps v3</a></h1>
            </div>
            <div data-role="content">   
                <div class="ui-bar-c ui-corner-all ui-shadow" style="padding:1em;">
                    <div id="map_canvas" style="height:350px;"></div>
                </div>
                <div id="results" style="display:none;">
                    <div id="directions"></div>
                </div>
            </div>
        </div>      
    </body>
</html>


Step:2

The below example locates the current position and it automatically calculates the distance and displays the route details between the current location and a static predefined destination location.

<!doctype html>
<html lang="en">
   <head>
        <title>jQuery mobile with Google maps</title>
        <link rel="stylesheet" href="http://code.jquery.com/mobile/1.2.0/jquery.mobile-1.2.0.min.css" />
        <script src="http://code.jquery.com/jquery-1.8.2.min.js"></script>
        <script src="http://code.jquery.com/mobile/1.2.0/jquery.mobile-1.2.0.min.js"></script>
        <script type="text/javascript" src="http://maps.google.com/maps/api/js?v=3&sensor=false&language=en"></script>
        <script type="text/javascript">

            var map,
                currentPosition,
                directionsDisplay, 
                directionsService;

            function initialize(lat, lon)
            {
                directionsDisplay = new google.maps.DirectionsRenderer(); 
                directionsService = new google.maps.DirectionsService();

                currentPosition = new google.maps.LatLng(lat, lon);

                map = new google.maps.Map(document.getElementById('map_canvas'), {
                   zoom: 15,
                   center: currentPosition,
                   mapTypeId: google.maps.MapTypeId.ROADMAP
                 });

                directionsDisplay.setMap(map);

                 var currentPositionMarker = new google.maps.Marker({
                    position: currentPosition,
                    map: map,
                    title: "Current position"
                });

                var infowindow = new google.maps.InfoWindow();
                google.maps.event.addListener(currentPositionMarker, 'click', function() {
                    infowindow.setContent("Current position: latitude: " + lat +" longitude: " + lon);
                    infowindow.open(map, currentPositionMarker);
                });
            }

            function locError(error) {
                // initialize map with a static predefined latitude, longitude
               initialize(59.3426606750, 18.0736160278);
            }

            function locSuccess(position) {
                initialize(position.coords.latitude, position.coords.longitude);
            }

            function calculateRoute() {
                var targetDestination = $("#target-dest").val();
                if (currentPosition && currentPosition != '' && targetDestination && targetDestination != '') {
                    var request = {
                        origin:currentPosition, 
                        destination:targetDestination,
                        travelMode: google.maps.DirectionsTravelMode["DRIVING"]
                    };

                    directionsService.route(request, function(response, status) {
                        if (status == google.maps.DirectionsStatus.OK) {
                            directionsDisplay.setPanel(document.getElementById("directions"));
                            directionsDisplay.setDirections(response); 

                            /*
                                var myRoute = response.routes[0].legs[0];
                                for (var i = 0; i < myRoute.steps.length; i++) {
                                    alert(myRoute.steps[i].instructions);
                                }
                            */
                            $("#results").show();
                        }
                        else {
                            $("#results").hide();
                        }
                    });
                }
                else {
                    $("#results").hide();
                }
            }

            $(document).live("pagebeforeshow", "#map_page", function() {
                navigator.geolocation.getCurrentPosition(locSuccess, locError);
            });

            $(document).on('click', '#directions-button', function(e){
                e.preventDefault();
                calculateRoute();
            });

        </script>
    </head>
    <body>
        <div id="basic-map" data-role="page">
            <div data-role="header">
                <h1><a data-ajax="false" href="/">jQuery mobile with Google maps v3</a></h1>
            </div>
            <div data-role="content">   
                <div class="ui-bar-c ui-corner-all ui-shadow" style="padding:1em;">
                    <div id="map_canvas" style="height:350px;"></div>
                </div>
                <div data-role="fieldcontain">
                    <label for="target-dest">Target Destination:</label>
                    <input type="text" name="target-dest" id="target-dest" value=""  />
                </div>
                <a href="#" id="directions-button" data-role="button" data-inline="true" data-mini="true">Get Directions</a>
                <div id="results" style="display:none;">
                    <div id="directions"></div>
                </div>
            </div>
        </div>      
    </body>
</html>

Friday, December 5, 2014

How to checkbox value assign in Phonegap using Jquery

I want to assign the default value true in checkbox using jquery. I tried some of the way to assign using like javascript

document.getElementById("checkbox-1").value()=true;


and

$("#checkbox-1").checked(true);
$("#checkbox-1").attr("checked","checked");


the checkbox value i does not assign the value.

Finally i tried this I fixed. Its working

 $("#checkbox-1").attr("checked",true).checkbox("refresh");

Thursday, December 4, 2014

Get PhoneNumber and mobile IMEI Number from Android Device using Phonegap

I was a bit surprised when my friend asked me how to do this in one day. I find the solution for Get Phone imei number and PhoneNumber using Phonegap. Its just very easy to implement in phonegap android application.
Just follow this steps:
Step:1
Select your cordovaActivity file from the phonegap src folder.
copy this javascriptInterface and past in your cordovaActivity class onCreate method.

Change your Class name in javascriptInterface Parameter.

 appView.addJavascriptInterface(this, "CordovaApp");             
        Log.d(TAG, " after finish toast " );   


Step:2

This method is get imei number from the Android phone. just copy and past your cordovaActivity class inside.

 @JavascriptInterface
  public String get_imei() 
  {
  String imei="";
  try
  {
  TelephonyManager telephonyManager = (TelephonyManager)getSystemService(Context.TELEPHONY_SERVICE);
     imei = telephonyManager.getDeviceId();
  }catch(Exception e)
  {
  Log.e(TAG, "Exception at onCreate()" + e.toString()); 
  }
    return imei;    
  }


Step:3

This method is get Phonenumber which you insert in your Android mobile. just copy and past your cordovaActivity class inside.

@JavascriptInterface
  public String getMobileNumber() 
  {
  String PhoneNumber="";
  try
  {
 TelephonyManager tm = (TelephonyManager) getSystemService(Context.TELEPHONY_SERVICE);
      PhoneNumber = tm.getLine1Number();
  }catch(Exception e)
  {
  Log.e(TAG, "Exception at getMobileNumber()" + e.toString()); 
  }
 return PhoneNumber;    
  }


Step:4

Just add all the blow Packages in your cordovaActivity class.

import android.telephony.TelephonyManager;
import android.webkit.JavascriptInterface;
import android.widget.Toast;


Step:5

This one add in your androidmanifest.xml file.

<uses-permission 
    android:name="android.permission.READ_PHONE_STATE" />


Step:6

this is on javascript to get Phonenumber and imei number which you want to call this methods from the javascript.

var phone imei_number = window.CordovaApp.get_imei();
var phonenumber = window.CordovaApp.getMobileNumber();
This is on Final Code:
package com.example.timers;

import android.content.Context;
import android.os.Bundle;
import android.telephony.TelephonyManager;
import android.util.Log;
import android.webkit.JavascriptInterface;
import android.widget.Toast;
import org.apache.cordova.*;

public class CordovaApp extends CordovaActivity
{
  
 private static final String TAG = "CordovaApp";
 
 CustomNativeAccess cna; 
 
    @Override
    public void onCreate(Bundle savedInstanceState)
    {
        super.onCreate(savedInstanceState);
        super.init();
        appView.addJavascriptInterface(this, "CordovaApp");             
        Log.d(TAG, " after finish toast " );       
        // Set by <content src="index.html" /> in config.xml
        loadUrl(launchUrl);  
    }
 
 @JavascriptInterface
  public String get_imei() 
  {
  String imei="";
  try
  {
  TelephonyManager telephonyManager = (TelephonyManager)getSystemService(Context.TELEPHONY_SERVICE);
     imei = telephonyManager.getDeviceId();
  }catch(Exception e)
  {
  Log.e(TAG, "Exception at onCreate()" + e.toString()); 
  }
    return imei;    
  }
 
 
 @JavascriptInterface
  public String getMobileNumber() 
  {
  String PhoneNumber="";
  try
  {
 TelephonyManager tm = (TelephonyManager) getSystemService(Context.TELEPHONY_SERVICE);
      PhoneNumber = tm.getLine1Number();
  }catch(Exception e)
  {
  Log.e(TAG, "Exception at getMobileNumber()" + e.toString()); 
  }
 return PhoneNumber;    
  }
 
 
}

this code only for an Android.

Tuesday, November 25, 2014

Check value exist or Not (AND) Insert the values in Sqlite database using Phonegap

I have written a code that I id not exist insert values of a record in sqlite database.
If already exist just update or do something else. Its just easy way to do.
I have followed this code and written some phonegap application. easy to bind from the sqlite table further use to display the page.
function insertIndustry(industryID,industry)
{
    db = window.openDatabase("mydb","0.1","InsuranceDb", 500000);
    
    var selectQuery ="SELECT COUNT(*) AS MyCount FROM industrymaster WHERE industryId="+industryID;
    db.transaction(function selectQueryDB(tx){tx.executeSql(selectQuery,[],function txSuccessResult(tx,results) {
                          
                              var messageid = results.rows.item(0)['MyCount'];
                               if(messageid == 1)
                                {
                                 console.log("exist");
                                }
                                else
                                {
                                 tx.executeSql("INSERT INTO industrymaster(industryId, industry) VALUES ("+industryID+",'"+industry+"')");
                                }
                              
                             },errorCB);  }, errorDB);
}

function errorCB(err) {
     console.log("Error processing SQL 1: "+err.code);
}

function errorDB(error) {
    console.log(error +"Error processing SQL 1: ");   
}

Check the username and password while User Login in Phonegap

I am working in phonegap application. we have allow only authenticate user. when user login in my application. I want to check the username and password in sqlite database using jquery.
I have created a login page with username and password and if I click the login button it should check if the entered username and password matches with the database(websql) and if it is successfull should go to the next page
Is this correct or should I use some additional methods or steps
If this is not correct may I have a coding to authenticate username and password in sqlite using Jquery/Javascript
var x="SELECT * FROM login WHERE username='"+user+"' AND password='"+pwd+"' ";    
tx.executeSql(x,[],function(tx,result){
          if (result.rows.length > 0){

            alert("Username : " +  result.rows[0].username);
            alert("Password: " + result.rows[0].password); 
          }else{
            alert("User not found!");
          }
    });

Thursday, November 20, 2014

Generate Cordova android jar file and free download cordova-3.5.0 jar file

I want to upgrade my cordova jar file. I just simply created.
Download cordova-android-3.5.0.zip file and extract the zip file.
Just follow the 3 step to generate cordova jar file.

C:\Documents and Settings\cordova-android\framework>android update project -p .
Updated local.properties

Its will build the project local properties file.

build.xml: Found version-tag: custom. File will not be updated.
Added file C:\Documents and Settings\cordova-android\framework\proguard-project.txt

And then you can create ant jar file using this command.

C:\Documents and Settings\cordova-android\framework>ant jar

If ant build xml file is not found you can download the ant package and just set the ant pin folder path as envinoment path
and then you can try ant jar command.
cordova android jar file will build like this

Buildfile: C:\Documents and Settings\cordova-android\framework\build.xml

-pre-build:

-check-env:
 [checkenv] Android SDK Tools Revision 22.3.0
 [checkenv] Installed at C:\Programmi\adt-bundle-windows-x86\sdk

-setup:
     [echo] Project Name: Cordova
  [gettype] Project Type: Android Library

-build-setup:
[getbuildtools] Using latest Build Tools: 18.1.0
     [echo] Resolving Build Target for Cordova...
[gettarget] Project Target:   Android 4.4
[gettarget] API level:        19
     [echo] ----------
     [echo] Creating output directories if needed...
    [mkdir] Created dir: C:\Documents and Settings\cordova-android\framework\libs
    [mkdir] Created dir: C:\Documents and Settings\cordova-android\framework\bin
    [mkdir] Created dir: C:\Documents and Settings\cordova-android\framework\bin\res
    [mkdir] Created dir: C:\Documents and Settings\cordova-android\framework\bin\rsOb
j
    [mkdir] Created dir: C:\Documents and Settings\cordova-android\framework\bin\rsLi
bs
    [mkdir] Created dir: C:\Documents and Settings\cordova-android\framework\gen
    [mkdir] Created dir: C:\Documents and Settings\cordova-android\framework\bin\clas
ses
    [mkdir] Created dir: C:\Documents and Settings\cordova-android\framework\bin\dexe
dLibs
     [echo] ----------
     [echo] Resolving Dependencies for Cordova...
[dependency] Library dependencies:
[dependency] No Libraries
[dependency]
[dependency] ------------------
     [echo] ----------
     [echo] Building Libraries with '${build.target}'...
   [subant] No sub-builds to iterate on

-code-gen:
[mergemanifest] Merging AndroidManifest files into one.
[mergemanifest] Manifest merger disabled. Using project manifest only.
     [echo] Handling aidl files...
     [aidl] No AIDL files to compile.
     [echo] ----------
     [echo] Handling RenderScript files...
     [echo] ----------
     [echo] Handling Resources...
     [aapt] Generating resource IDs...
     [echo] ----------
     [echo] Handling BuildConfig class...
[buildconfig] Generating BuildConfig class.

-pre-compile:

-compile:
    [javac] Compiling 90 source files to C:\Documents and Settings\cordova-android\fr
amework\bin\classes
    [javac] Note: Some input files use or override a deprecated API.
    [javac] Note: Recompile with -Xlint:deprecation for details.
     [echo] Creating library output jar file...
      [jar] Building jar: C:\Documents and Settings\cordova-android\framework\bin\cla
sses.jar

jar:
      [jar] Building jar: C:\Documents and Settings\cordova-android\framework\cordova
-3.5.0.jar

BUILD SUCCESSFUL
Total time: 4 seconds

cordova jar file will be created in your framework folder
cordova android-3.5.0 js file download
Cordova android-3.5.0 jar file download

Guys Cordova android-3.5.1 jar file download codemasterclubs.blogspot.in from this site.

Tuesday, November 18, 2014

Get Jquery mobile dropdown selected Item in Phonegap

I want to get the jquery mobile dropdown selected value and selected text.
this script get the selected text value in phonegap.
$("#yourdropdown option:selected").text();

this script get the dropdown selected value in phonegap.
$("#yourdropdown").val();

Monday, November 17, 2014

Set Environment Variable for Phonegap in Windows

1. Go to Start Menu and right click on Computer. Select Properties.

2. Select Advanced system settings.

3. In the Advanced tab, select Environment Variables.

4. First check the command prompt like this,

Friday, November 14, 2014

Json Parse using javascript

I am working in phone gap application i want to get the json value and display in web page using javascript while when i hot code my json format value.

I can able to get the all the values when i try to get dynamically. I can't get the values so. I have tried the json parse. Its working correctly because the dainamic url values all getting string format. so i can't get correctly.

var json = '{"result":true,"count":1}',
    obj = JSON.parse(json);

alert(obj.count);

Friday, November 7, 2014

Get Current Location using Geolocation plugin in Phonegap

I am working in phonegap application in my application i want to use Geolocation plugin used for get CurrentLocation in android and ios device.

I have done. just following this instruction.

I have posted the sample application using local development.Download

cordova plugin add https://github.com/apache/cordova-plugin-geolocation.git

Permissions Android

app/res/xml/config.xml

<feature name="Geolocation"><param name="android-package" value="org.apache.cordova.geolocation.GeoBroker"></feature>

app/AndroidManifest.xml

<uses-permission android:name="android.permission.ACCESS_COARSE_LOCATION" />
<uses-permission android:name="android.permission.ACCESS_FINE_LOCATION" />
<uses-permission android:name="android.permission.ACCESS_LOCATION_EXTRA_COMMANDS" />

IOS 8: just u can add this two option


code:2 message: the operation couldn't be completed. (kCLErrorDomain error 0)

I am working in Phonegap application. when i used Geolocation plugin for getCurrentlocation in simulator i got the error message.


code:2 message: the operation couldn't be completed. (kCLErrorDomain error 0).


because of this error will come while u didn't send the location menually.

just follow this:

Thursday, October 30, 2014

Image convert to String using Javascript

I am working as phonegap developer past 1 year. I want to save the image in my database. so i want to convert image to string .

 Create a canvas, load your image into it and then use toDataURL() to get the base64 representation (actually, it's a data: URL but it contains the base64-encoded image)


<!DOCTYPE HTML PUBLIC "-//W3C//DTD HTML 4.01//EN" "http://www.w3.org/TR/html4/strict.dtd">
<html>
<head>
    <title>File Transfer Example</title>
 <script type="text/javascript" src="http://code.jquery.com/jquery-1.7.1.js"></script>
   </head>
<body>
  <input type="file" id="file" />
<div id="imgTest"></div>
<div id="testing"></div>
<script type='text/javascript'>
var _URL = window.URL || window.webkitURL;

$("#file").change(function(e) {
    var file, img;


    if ((file = this.files[0])) {
        img = new Image();
        img.onload = function() {
if(this.width > 150 && this.height > 150 )
            {
            alert("please upload image size 150 X 100");
            }
            else{
            var filesSelected = document.getElementById("file").files;
    if (filesSelected.length > 0)
    {
        var fileToLoad = filesSelected[0];

        var fileReader = new FileReader();

        fileReader.onload = function(fileLoadedEvent) {
            var srcData = fileLoadedEvent.target.result; // <--- data: base64

            var newImage = document.createElement('img');
            newImage.src = srcData;

            document.getElementById("imgTest").innerHTML = newImage.outerHTML;
            alert("Converted Base64 version is "+document.getElementById("imgTest").innerHTML);
            console.log("Converted Base64 version is "+document.getElementById("imgTest").innerHTML);
   document.getElementById("testing").innerHTML = srcData;
        }
        fileReader.readAsDataURL(fileToLoad);
    }
            }
        };
        img.onerror = function() {
            alert( "not a valid file: " + file.type);
        };
        img.src = _URL.createObjectURL(file);


    }

});
</script>
</body>
</html>

Jquery mobile datepicker for Phonegap

I am working us a phonegap developer past 1 year. i used pickerview for datepicker. when i update ios 8. the pickerview bug. so i changed the jquery mobile theme based date picker.

Its very easy to call the date picker popup using the jquery mobile theme base date picker without jquery theme cannot be work.

Some ios pickerview not working in ios 8 but this date picker work all the platform.


<!DOCTYPE html>
<html lang="en">
  <head>
    <meta http-equiv="Content-Type" content="text/html; charset=utf-8" />
    <meta name="viewport" content="width=device-width, initial-scale=1">
    <title>jQueryMobile - DateBox Demos</title>
    <link rel="stylesheet" href="http://code.jquery.com/mobile/1.4.4/jquery.mobile-1.4.4.min.css" />
    <link rel="stylesheet" href="http://cdn.jtsage.com/datebox/1.4.4/jqm-datebox-1.4.4.min.css" />
    <link type="text/css" href="css/demos.css" rel="stylesheet" />
    <!-- NOTE: Script load order is significant! -->
    <script type="text/javascript" src="http://code.jquery.com/jquery-2.1.1.js"></script>
    <script type="text/javascript" src="http://code.jquery.com/mobile/1.4.4/jquery.mobile-1.4.4.min.js"></script>
    
    
    <script type="text/javascript" src="http://cdn.jtsage.com/datebox/1.4.4/jqm-datebox-1.4.4.core.min.js"></script>
    
    
    <script type="text/javascript" src="http://cdn.jtsage.com/datebox/1.4.4/jqm-datebox-1.4.4.mode.flipbox.min.js"></script>
    
    <script type="text/javascript">
    jQuery.extend(jQuery.mobile,
    {
      ajaxEnabled: false
    });
 
    </script> 
  </head>
  <body>
  
    <div data-role="page" id="main" align="center" style="width:100px;" >     
    
      <center>
          
            <label for="mode7">TimeFlipBox</label>
            <input name="mode7" id="mode7" type="text" data-role="datebox" data-options='{&quot;mode&quot;:&quot;flipbox&quot;}' readonly=true />
         </center>
       
    </div>
</html>

Jquery mobile Time Picker for Phonegap

I am working us a phonegap developer past 1 year. i used pickerview for timepicker. when i update ios 8. the pickerview bug. so i changed the jquery mobile theme based time picker.

Its very easy to call the time picker popup using the jquery mobile theme base time picker without jquery theme cannot be work.

Some ios pickerview not working in ios 8 but this time picker work all the platform.


<!DOCTYPE html>
<html lang="en">
  <head>
    <meta http-equiv="Content-Type" content="text/html; charset=utf-8" />
    <meta name="viewport" content="width=device-width, initial-scale=1">
    <title>jQueryMobile - DateBox Demos</title>
    <link rel="stylesheet" href="http://code.jquery.com/mobile/1.4.4/jquery.mobile-1.4.4.min.css" />
    <link rel="stylesheet" href="http://cdn.jtsage.com/datebox/1.4.4/jqm-datebox-1.4.4.min.css" />
    <link type="text/css" href="css/demos.css" rel="stylesheet" />
    <!-- NOTE: Script load order is significant! -->
    <script type="text/javascript" src="http://code.jquery.com/jquery-2.1.1.js"></script>
    <script type="text/javascript" src="http://code.jquery.com/mobile/1.4.4/jquery.mobile-1.4.4.min.js"></script>
    
    
    <script type="text/javascript" src="http://cdn.jtsage.com/datebox/1.4.4/jqm-datebox-1.4.4.core.min.js"></script>
    
    
    <script type="text/javascript" src="http://cdn.jtsage.com/datebox/1.4.4/jqm-datebox-1.4.4.mode.flipbox.min.js"></script>
    
    <script type="text/javascript">
    jQuery.extend(jQuery.mobile,
    {
      ajaxEnabled: false
    });
 
    </script>
 <style>
 .ui-datebox-flipcenter{width:160px;}
 </style>
  </head>
  <body>
  
    <div data-role="page" id="main" align="center" style="width:100px;" >     
    
      <center>
          
            <label for="mode7">TimeFlipBox</label>
            <input name="mode7" id="mode7" type="text" data-role="datebox" data-options='{"mode": "timeflipbox", "useNewStyle":true,"overrideTimeFormat": 24}' />
         </center>
       
    </div>
</html>

Phonegap Installation Document in Mac

PhoneGap is a great tool for building cross-platform mobile apps using web technologies. Getting started with it seems pretty easy according to their install guide:

Install Phonegap Environment setup:

First i will tell you how to install Phonegap in mac System.

Step : 1

(a).Install x-code lastest version.
(b).Install Node.js.

To Install, ensure that you have NodeJS installed, then open your commandline and run the following:

(c).Install Cordova (or) Phonegap
Apples-MacBook-Pro:~ apple$ npm install -g cordova

(or)

Apples-MacBook-Pro:~ apple$ npm install -g phonegap

Once installation completes, just check the Path in command line using this command.
Apples-MacBook-Pro:~ apple$ cordova -version
3.5.0-0.2.7

(d).Install Apache-Ant. Run brew update & then install ant brew install ant
Step 2: For iOS development, Run to the App Store & Download the latest version of XCode. After the installation is completed, launch the application & accept the license, terms.
Step 3: For Android development, Navigate here & download the ADT bundle for MAC. After the download is completed, unzip the file. Navigate inside the eclipse folder and run Eclipse.app. Once eclipse loads up, You will see a menu bar on the top left hand corner

Click on the 3rd icon from right (in the above image). This will launch the Android SDK Manager. You can select the targeted Android version from the list.

Step 4: Configure Android SDK. We need to hook up the SDK path.
In your terminal, Run cd ~ Remember where you have downloaded the ADT Eclipse? We need to head back to the unzipped folder & then into SDK & then into tools folder. Right click & click Get Info.. You should see a path.
On my mac, this is how it will look
export 
PATH=/Users/me/Development/adt-bundle-mac-x86_64-20130917/sdk/tools:Users/me/Development/adt-bundle-mac-x86_64-20130917/sdk/platform-tools:$PATH

Next, lets edit the .bash_profile & add the SDK instance open -e .bash_profile & add the above line to the top of the file. Save and close .bash_profile
If you want to use the same code and functionality in android and ios application u can create local developer project.
If you want to develop android and ios app support Mac OS
just create a phonegap project in terminal.
Add Platforms:
$ cd hello

$ cordova platform add ios
$ cordova platform add android

next build the platforms using this command:
$ cordova build ios.
$ cordova build android.

Open your project folder hello/platforms/ios
double click ios "HelloWorld.xcodeproj".
this project file will open in x-code.
and develop your project pages in www folder.

Wednesday, July 30, 2014

Student mark list continue

<%@ Page Language="C#" MasterPageFile="~/MasterPage.master" AutoEventWireup="true"
    CodeFile="MarkDetails.aspx.cs" Inherits="Mark" %>

<asp:Content ID="Content1" ContentPlaceHolderID="ContentPlaceHolder1" runat="Server">
    <!DOCTYPE html PUBLIC "-//W3C//DTD XHTML 1.0 Transitional//EN" "http://www.w3.org/TR/xhtml1/DTD/xhtml1-transitional.dtd">
    <html xmlns="http://www.w3.org/1999/xhtml">
    <head id="Head1">
        <title>Mark Details</title>
    </head>

    <script type="text/javascript">
function GetMarkDetails()
{
    var SubjectCount = document.getElementsByName("subject").length;
//    alert(SubjectCount);
    var value="";
    var strSubjectID = "";
    for(var i=0; i<SubjectCount; i++)
    { 
    if(value + document.getElementById("txtSubject" + i).value == "")
    {
 alert("Please enter Your Marks");
         return false;
 }
 
    value = value + document.getElementById("txtSubject" + i).value +","; 
    strSubjectID = strSubjectID + document.getElementById("hidSubject" + i).value.replace("/","") + ",";
//    alert(strSubjectID)
    }
      document.getElementById("hidMarks").value=value;
      document.getElementById("hidSubject").value=strSubjectID;      

}

    </script>

    <body>
        <%--<form id="form1" runat="server">--%>
        <center>
            <div>
                <table>
                    <tr>
                        <td style="width: 400px;">
                            <div>
                                <center>
                                    <table>
                                        <tr>
                                            <td>
                                                <table border="1">
                                                    <tr style="background-color: Crimson; color: Snow;">
                                                        <th colspan="2">
                                                            Student Master
                                                        </th>
                                                    </tr>
                                                    <tr>
                                                        <td>
                                                            Student Name
                                                        </td>
                                                        <td>
                                                            <asp:DropDownList ID="DDLThird" runat="server" AutoPostBack="True" OnSelectedIndexChanged="DDLThird_SelectedIndexChanged"
                                                                DataTextField="Student_Name" DataValueField="Student_ID">
                                                                <asp:ListItem Text="Select" Value=""></asp:ListItem>
                                                            </asp:DropDownList>
                                                        </td>
                                                    </tr>
                                                </table>
                                                <div>
                                                    <asp:ScriptManager ID="ShowSubjectAlert" runat="server" />
                                                </div>
                                            </td>
                                        </tr>
                                        <tr align="right">
                                            <td colspan="2">
                                                <input type="hidden" name="hidden1" id="hidMarks" value="" runat="server" />
                                                <input type="hidden" name="hidden2" id="hidSubject" value="" runat="server" />
                                            </td>
                                        </tr>
                                    </table>
                                </center>
                            </div>
                            <center>
                                <div id="divMark" runat="server">
                                </div>
                                <table>
                                    <tr>
                                        <td>
                                            <asp:Button ID="btnAddMarks" Text="Add Marks" runat="server" OnClientClick="GetMarkDetails()"
                                                OnClick="btnAddMarks_Click" Visible="true"></asp:Button>
                                        </td>
                                        <td>
                                            <asp:Button ID="btSubjectMaster" Text="Back" runat="server" OnClick="SubjectMaster_Click" /><asp:Button
                                                ID="btGridview" Text="Next" runat="server" OnClick="GridViewNext_Click" />
                                        </td>
                                    </tr>
                                </table>
                            </center>
                        </td>
                    </tr>
                </table>
            </div>
        </center>
        <%-- </form>--%>
    </body>
    </html>
</asp:Content>